Thursday, October 20, 2016

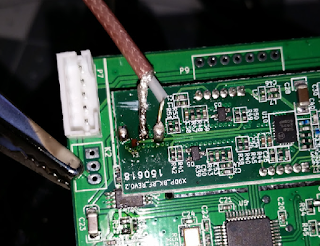
Taranis X9D Plus antenna upgrade FAIL.


What's the big deal with the pic above? I'll tell you in a sec. There's so many videos and posts about upgrading the Taranis antenna, so I decided to do it tonight.


After peeling off the hot glue, it didn't look too bad. I took off the original antenna wire and the pad is really tiny. I went ahead. 

Back to this pic. I soldered the center wire and as I was bending the outer wires with very little pressure and the pad popped off. In the picture, you can see the square copper pad. 

After looking at the cost of replacement boards, I started looking at ways that I might be able to fix it. I scraped away the green coating over the PCB portion that ran to the pad. I was really lucky that the board is printed the way it is. There was very little copper, but I was able to get the solder ball to stick to it.

I used plenty of hot glue to make sure that it never moves. 

I used my reamer from RC car bodies to make a new hole for the RP-SMA connector. 

Picture of antenna attached.

Side view.


I definitely would not recommend doing this mod unless you are really good at soldering. If I could start over, I would of spliced the old antenna and would have never touched the solder joints. 

Sunday, October 16, 2016

Eachine VR D2 Audio Out and DVR Audio from both Diversity Receivers


I've been following the long thread on RCGroups:
http://www.rcgroups.com/forums/showthread.php?t=2717038&highlight=vr+d2&page=124

At the time of this post, that thread is at 124 pages.

I opened up my VR D2 today and decided to do what vzzbx did:
http://www.rcgroups.com/forums/showthread.php?t=2751663

During my search for the post, I found this Wilgo_rr's post:
http://www.rcgroups.com/forums/showthread.php?t=2758891&highlight=vr+d2+audio

Wilgo_rr's video shows that he found the audio out for not just one receiver, but both Diversity receivers.

Combining both of these guys' info, I can confirm that combining all the audio and ground wires allows you to get the best of both worlds, Audio Out and Audio DVR recording.


I always save the extra connectors and was able to find the wires that already had the JST connectors crimped on. On the Diversity board, the Red wire is the audio signal OUT, Black is ground. On the DVR board, Red wire is audio in, Black is ground. 

A closer look at the connectors.

I found a headphone extension cable cut to the length I liked. Black is ground. Both Red and White are audio signal wires, but I don't know which are right and left. I twisted the Red and White wires together to give me a stereo effect. If you are going to use Apple headphones, make sure to double-check your wiring. Apple likes to switch stuff around to make their headphones proprietary. 

I was just testing the Audio Out.

Testing both Audio Out and DVR Audio recording. 

Another shot of testing.

I drilled a hole here with a drill bit that was as close to the diameter of my headphone extension cable. Your cable might be a different size.

I ran the headphone extension cable through the hole I drilled. I added a rubber grommet to reduce the chance of pulling apart the connections.

I didn't bother soldering the wires. Just twisted with Heatshrink tubing ready. They should hold fine.

Completed wiring.


I am just waiting for my replacement DVR that supposedly corrects the blackscreens.
Another good thing to do while you have it open, replace those crappy straps. I used the straps from a cheap GoPro head mount.


Sunday, October 9, 2016

HS1177 Camera: Using the Joystick OSD cable while mounted

I found it very annoying to hook up an external power source and using my TV to try to set up my camera. I saw videos of people making battery mods to use the barrel connector and portable monitors to change settings while outdoors. I really wanted to be able to change settings on the fly.

I'm sorry that I don't have a camera setup that is optimal for youtube videos. The GoPro headstrap is all I have for now.

Here's my method to having the option to set up my camera whenever I want without dismantling the quadcopter and using my VTX and goggles.


If you don't want to watch the video, the basic gist of it is:

  1. On the joystick, you will not be using video and power wires. You will only use Signal and Ground.
  2. On the camera, you will connect the Signal wire to the OSD wire, and splice Ground to Ground.
  3. You will want to make a 4-pin Micro (or Mini, I'm not sure) JST female coupler to connect the joystick to the camera. 


Tuesday, October 4, 2016

The real startup cost of FPV Quadcopter Racing: Starting from scratch


We've all heard of the camera drones on the news and of their increasing popularity. I had no interest in multi-rotor copters until some videos started showing up on my news feeds from people named Charpu and Skitzo. Just like you, I thought that this was some really cool stuff... flying around like Superman or like you are riding a Star Wars speeder bike. This makes me want to sell my nitro RC cars. I went ahead and bought a toy grade quad with FPV (XK X250) to make sure I wanted to get into this hobby. 

So the interest was there, but how much does it all cost. I saw stuff like Fatshark goggles costing close to $500 and got deterred pretty quickly. This was just too expensive. Then I started to find out about these Chinese websites that seem to sell directly from the factories over there. Yeah, all the individual parts can be cheap, but it will all add up really fast.

My quadcopter (pictured above) is now in a flying state. Everything is working, I just need to tune it. In choosing parts, I realized that you have to research each and every component. I might go into the parts in another post. Today is about realizing all of the parts, accessories, and tools that you will need to get started. 

I've kept track of all the money that I spent on this hobby so far. In the following spreadsheet, you will notice that I don't have motors listed. This is because a friend of mine hooked me up. I also put a few notes next to the description of some parts.